PDF Studio 12 has a new Advanced Imposition Module that allows to preview and create PDF Imposition Layouts. Imposition layouts can be created using many different industry standard layout and binding methods including: 2, 4, & 8 up booklets; cut stacks; sequential, step and repeat. It is possible to save custom imposition profiles.
What is Imposition?
Imposition is one of the fundamental steps in the prepress printing process. It consists in the arrangement of the printed product’s pages on the printer’s sheet, in order to obtain faster printing, simplify binding and reduce paper waste.
Correct imposition minimizes printing time by maximizing the number of pages per impression, reducing cost of press time and materials. To achieve this, the printed sheet must be filled as fully as possible.
Imposition Features
Layout
- Type – the imposition layout choices available
- 2-Up Booklet: fits 2 pages side by side on a sheet
- 4-Up Booklet: fits 4 pages (2 rows & 2 pages per row) on a sheet
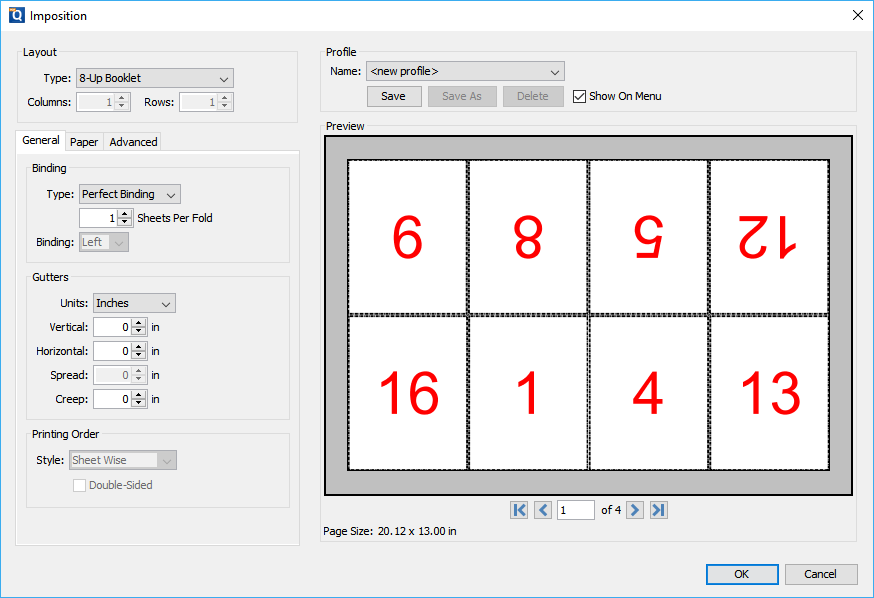
- 8-Up Booklet: fits 8 pages (2 rows & 4 pages per row) on a sheet
- Cut stacks: fits the pages per sheet using the column and row settings so that once cut each stack can be placed on each other maintain the page order for binding
- Sequential: fits multiple pages per sheet using the column and row settings in sequential order from right to left top to bottom
- Step and Repeat: creates multiple copies of the each page on separate sheets based on the number rows and columns set
- Columns – Sets the number of vertical columns for Cut Stacks, Sequential, & Step and Repeat
- Rows – Sets the number of horizontal rows for Cut Stacks, Sequential, & Step and Repeat
Profiles
- Provides the ability to create and save profiles that can be reused at a later time.
General
Binding
- Type – determines how the pages will be bound together once printed
- Saddle-Stitching: staples each of the pages along a center fold such as a magazine, or catalog.
- Perfect Binding: the sheets are split into stacks designated by the “Sheets per fold”. Then the spine edge is trimmed from each stack and then glue is applied to the spine so the cover can be adhered to spine to create a book.
- Sheets per fold – designates the number of pages per stack when using Perfect Binding
- Binding (left/right) – Determines whether the binding (folded edge) of the booklet when folded should be on the left or the right
- Double Sided – Rearranges the pages so that pages are printed on the front and back per imposition sheet based on the binding type selected
Gutters
- Units – Select the measurement unit for the crop margins in either Inches, Points, Centimeters, or Millimeters
- Vertical – The space between each column of pages
- Note: for 8-up pages the “Spread” value is used for the center column between the 2nd & 3rd column.
- Horizontal – The space between each row of pages
- Spread – Used only for 8-up layout, this is the space between the 2nd & 3rd columns
- Creep – Specifies the distance pages move away from the spine to accommodate paper thickness and folding in Saddle Stitch and Perfect Bound layouts
Paper
Media
- Autosize Media – Resizes the sheet to fit the
- Fit to Media Size – Allows you to select a sheet size from a list of predefined standard sizes or set a sheet custom size.
- Portrait: sets the selected page orientation size to portrait
- Landscape: sets the selected page size orientation to landscape
- Note: Portrait and Landscape options are not available when selecting a “Custom” media size
- Width – Width of the page in the units selected
- Height – Height of the page in the units selected
- Auto-rotate – Rotates each individual page so that the width and length best fit on the sheet.
- Scale Pages – shrink pages so that they fit in the paper. No effect if the pages in a document are smaller than the paper they are being printed on.
Margins
- Units – Select the measurement unit for the crop margins in either Inches, Points, Centimeters, or Millimeters
- Top – The distance of the margin from the top
- Bottom – The distance of the margin from the bottom
- Left – The distance of the margin from the left
- Right – The distance of the margin from the right
Advanced
Printer Marks
- Trim Marks – Horizontal and vertical marks that define where the page should be trimmed.
- Bleed Marks – Displays the bleed crop box on the page. Useful when a document has images or elements that touch the edge of the page, extending beyond the trim edge and leaving no white margin.
- Registration Marks – Small targets outside the page area for aligning pages and colors separations in a document.
- Page Information – Labels the sheet in the top left corner with the document name, page number, date & time.
